Installing a Cluster on Windows Server 2008
1. Select 'Add Features' from Server manager.
2. Select 'Failover Clustering'
3. Complete the Install
Setup 'Failover Clustering'
1. Select 'Failover Cluster Management' from Administrative Tools.
2. Select 'Validate a configuration'
3. Select all nodes that are participating in the Cluster. click 'Browse' to select nodes.
4. Complete the Validation.
5. Select 'Create a Cluster'
6. Clik 'Browse' to select all the nodes that are going to participate in the new Cluster
7. type the a name for the new cluster under 'Cluster Name'
Type an IP Address for the new Cluster under 'Address'
8. complete the install.
Moving the 'Cluster Group to another Node'
Since the GUI does not allow to move the 'Cluster Group' into the other node,
select command prompt and type the following command to mvoe the group
to another NODE.
Last Modified July 13 2010.
Thursday, July 8, 2010
Wednesday, July 7, 2010
Multipathing(MPIO) Support in Windows Server 2008
A growing number of organizations require that their data be available 24x7, year round. To meet this requirement, centralized storage must be readily available and immune to outages at all times .The Microsoft Multipath I/O (MPIO) framework provides support for multiple data paths to storage to improve fault tolerance of connection to storage, and may in some cases provide greater aggregate throughput by using multiple paths at the same time:
Installing MPIO on Windows 2008:
From 'Server Manager', select 'Add Features'
Select 'Multipath I/O'
To configure MPIO for your Storage, Select MPIO from 'Administrative tools'
Specify the Device HW id for your Storage
(For this Example we are using the 3PAR Storage)
Configure the Load Balance policy for a LUN:
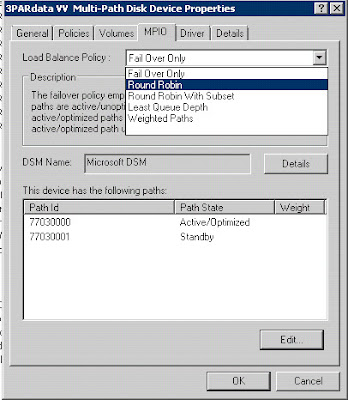
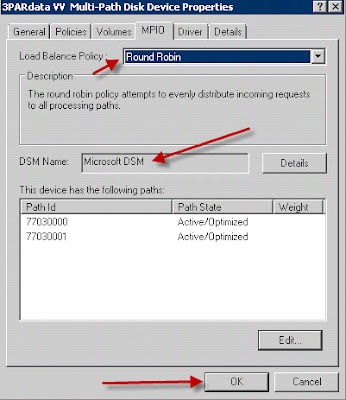
MPIO LUN load balancing is integrated with Disk Management. To configure MPIO LUN load balancing, start the Disk Management. Right click on the disk, then properties
Select the 'MPIO' tab
Change the 'Load Balance Policy' from 'Fail Over Only' to 'Round Robin'
Click OK to finish.
More details of MPIO on Windows:
http://download.microsoft.com/download/3/0/4/304083F1-11E7-44D9-92B9-2F3CDBF01048/MPIO.doc
Last Modified : 7th July 2010
Wednesday, June 23, 2010
How to create a Linked Server to MySQL from SQL Server 2008
Download Connector/ODBC for mySQL from
http://dev.mysql.com/downloads/connector/odbc/5.1.html
Install the Connector/ODBC driver on the Server where SQL Server 2008 installed.
Create an ODBC System DSN using the installed MySQL Driver
Select System DSN , Add
Select the MySQL Driver then Click 'Finish'
Fill out the appropriate information and click 'Test'
Create a Linked Server at SQL Server 2008 Management Studio.
Under 'Server Objects', right click on 'Linked Servers' and select 'new Linked Server'
At 'Link Server' type a Name
On 'Other data sources' , Select 'Microsoft OLE DB Provider for ODBC Drivers'
Type the DSN name you just created at 'Data Source'
at security , specify the appropriate login information
on 'Server options' select 'True' for both 'RPC' and 'RPC Out'
Modify the properties of the MSDASQL provider:
Use OPENQUERY to Query the Linked Server.
SELECT TOP 10 * FROM OPENQUERY(MKMYSQL, 'SELECT * FROM Users')
Last Modified : June 23, 2010
Monday, June 21, 2010
Connect to SSIS Service on Machine "SQLSErver" failed: Access is denied
Connecting to a Remote Integration Services Server
Connecting to an instance of Integration Services on a remote server, from SQL Server Management Studio or another management application, requires a specific set of rights on the server for the users of the application
If the user is not a member of the local Administrators group, add the user to the Distributed COM Users group. You can do this in the Computer Management MMC snap-in accessed from the Administrative Tools menu.
Open Control Panel, double-click Administrative Tools, and then double-click Component Services to start the Component Services MMC snap-in.
Expand the Component Services node in the left pane of the console. Expand the Computers node, expand My Computer, and then click the DCOM Config node.
Select the DCOM Config node, and then select MsDtsServer100 in the list of applications that can be configured
Right-click on MsDtsServer100 and select Properties.
In the MsDtsServer Properties dialog box, select the Security tab.
Under Launch and Activation Permissions, select Customize, then click Edit to open the Launch Permission dialog box.
In the Launch Permission dialog box, add or delete users, and assign the appropriate permissions to the appropriate users and groups. The available permissions are Local Launch, Remote Launch, Local Activation, and Remote Activation. The Launch rights grant or deny permission to start and stop the service; the Activation rights grant or deny permission to connect to the service.
Click OK to close the dialog box
Under Access Permissions, repeat above step to assign the appropriate permissions to the appropriate users and groups.
Close the MMC snap-in
Restart the Integration Services service
Last modified : June 21, 2010
Connecting to a Remote Integration Services Server
Connecting to an instance of Integration Services on a remote server, from SQL Server Management Studio or another management application, requires a specific set of rights on the server for the users of the application
If the user is not a member of the local Administrators group, add the user to the Distributed COM Users group. You can do this in the Computer Management MMC snap-in accessed from the Administrative Tools menu.
Open Control Panel, double-click Administrative Tools, and then double-click Component Services to start the Component Services MMC snap-in.
Expand the Component Services node in the left pane of the console. Expand the Computers node, expand My Computer, and then click the DCOM Config node.
Select the DCOM Config node, and then select MsDtsServer100 in the list of applications that can be configured
Right-click on MsDtsServer100 and select Properties.
In the MsDtsServer Properties dialog box, select the Security tab.
Under Launch and Activation Permissions, select Customize, then click Edit to open the Launch Permission dialog box.
In the Launch Permission dialog box, add or delete users, and assign the appropriate permissions to the appropriate users and groups. The available permissions are Local Launch, Remote Launch, Local Activation, and Remote Activation. The Launch rights grant or deny permission to start and stop the service; the Activation rights grant or deny permission to connect to the service.
Click OK to close the dialog box
Under Access Permissions, repeat above step to assign the appropriate permissions to the appropriate users and groups.
Close the MMC snap-in
Restart the Integration Services service
Last modified : June 21, 2010
Subscribe to:
Posts (Atom)